
Exporting Copies Of Adjusted Images From An Aperture Library:
Saving high quality copies of edited images from Aperture:
The Lightroom importer for Aperture Libraries is not able to transfer image editing settings. You can save copies of image previews with the originals but they are not full quality copies however. If you have a lot of time and effort invested in images that were edited for a particular look in Aperture that you want to preserve exactly as they were, and be able to make high quality reproductions you should use Aperture’s own tools to export high quality copies of the edited versions, either high quality JPEG (.jpg) or TIFF (.tif) files that are lossless and capable of higher bit depth color. TIFF files are much larger and unless you are working with RAW images in your library that contain more information and color range, high quality JPEG should be sufficient.
The exports will have all the editing baked in, and you won't be able to adjust them further as you had in Aperture, except to stack additional modifications over your prior adjustments.
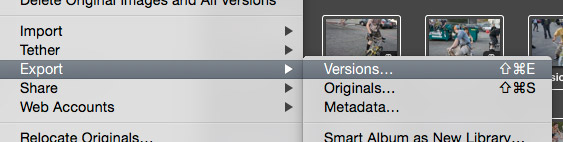
Most users have a very large library where most images are unedited, and only a selected few are singled out for adjustment. So you will want to use Aperture’s smart albums or filtering options to narrow down your images to only those that are edited and export edited copies of just those images.

How to create an Aperture smart album that contains all images that have visual adjustments applied. Useful if you want to export copies of the images with editing applied to preserve copies as you edited them, since the adjustment settings will not transfer, and the Lightroom import plug-in can only transfers preview files that are not full quality.

Command ⌘+A to ensure you select all images in your smart album.

How you want to organize these adjusted image export versions is up to you, but one way of approaching would be to organize them into folders named for their existing Aperture projects, underneath a directory on a drive where you want the images to live. A subfolder format of project name will make a folder underneath your selected destination folder for every project that your selected images live under in Aperture, and sort them accordingly.
If you are switching all your images to referenced files before importing to Lightroom (a process I've outlined here), then choosing the same folder destination and subfolder format options will put them in the same file structure together. To differentiate the file names further, I've made a custom name format that tags "_AdjustedExport" to the end of the images existing file names. This is especially important if your original and adjusted images are the same format, like JPEG, which would make them harder to sort apart if they were the same name and file type.

Under the name format drop down menu in the Aperture export dialog, I went to edit to make a custom name convention that keeps the original file name and tags custom text to the end of it, in this case "_AdjustedExport". So an image under this convention would be IMG_3841_AdjustedExport.jpg and so on for different file name.
If your library contains adjusted JPEG and RAW image files, to conserve as much space as possible, while maintaining as much quality as possible from the adjusted versions of your RAW files, you may want to split your export into two batches. One for exporting full size JPEG copies, and one for full size TIFF copies. TIFF files are much larger than JPEG and 16-bit TIFF files are much bigger than 8-bit TIFF, but 16-bit can preserve a broader gradient of grays and colors that exist in RAW format images, which can be useful for future adjustments or high quality reproductions. If you have the room and want to preserve as much color information as you can from your edited RAW files, I recomend exporting to 16-bit TIFF.
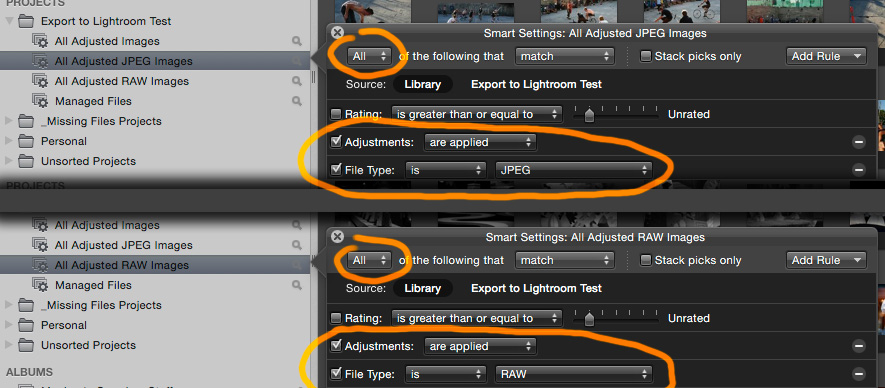
When you add additional rules, if you want images that meet all criteria combined, change the settings to all that match, rather than any. So in each of these cases the smart albums contain only photos that are adjusted and JPEG, or adjusted and RAW, respectively.
Once you have all of your adjusted images exported out you'll be able to work with them in Lightroom or any other software ensuring continued use or reproduction of copies of the image editing work you did in Aperture even after Aperture is no longer functional.
Exporting Book Layouts As PDF's:
If you have any books that you've made using Aperture, if you don't already have exported copies of them backed up, you may want to also export out your book layouts for potential future reuse. Lightroom does have it's own book creation tools that work quite well and you may be able to recreate a similar layout, but it will not import your book layout information.
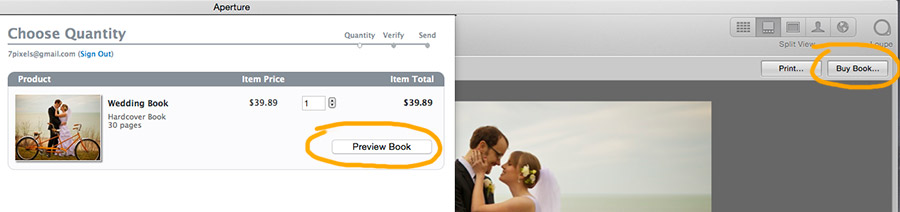
If you select a book and go into Aperture's book layout view, and go to the "Buy Book" button, in the following dialog box you can use the preview button to generate a full size multipage PDF document of your book layout that can be saved. The preview option in the "Buy Book" menu outputs a file with the layout and pages automacially sized exactly to your book sizing and layout settings. You can also generate a PDF from the print view, but it may crop off parts of your layout, or add extra dead space, depending on the paper output settings.