
The 3 core settings that control how light will effect your image in a camera:
* Shutter Speed
* Aperture
* ISO
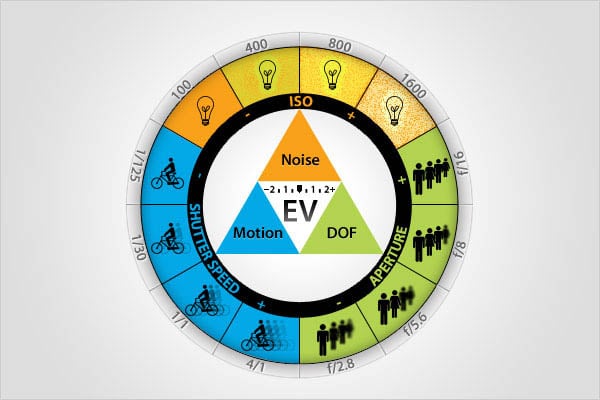
The exposure value, the intensity of light read by the camera, is defined by the interaction and combination of shutter speed, aperture and ISO, each of which has different visual effects on your image.
Shutter speed, aperture, and ISO each effects the amount light or sensitivity to light that hits the camera sensor, but with different mechanical or electronic processes that each have different visual effects on your exposed images. Understanding how each of these attributes function, interact with each other, and effect your images, is at the core of technical proficiency in photography, and an essentialy part of the creativie process. Exposure is how we describe the amount of light read by a sensor or film strip in a camera, effected by how long or how much light the sensor is exposed to. An overexposed images is one that is "blown out" with too much light, too bright and losing lots of detail in highlights, and underexposed is one with insufficient light making a scene too dark and losing lots of detail in shadows.
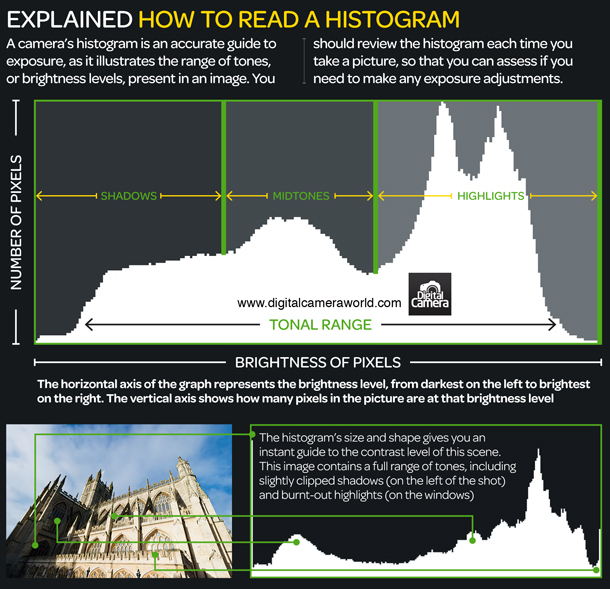
Many digital cameras now offer live, or review histograms charts that can be used to tell how much pixel information falls across a spectrum from dark to light, with indication if blowing out at the high end or low end, allowing more precison in tuning the exposure. You may not be interested in that level of detail, but if your finding images coming out to bright or two dark, it's an effective tool for quickly gauging the "lean" of your exposure across the scene.
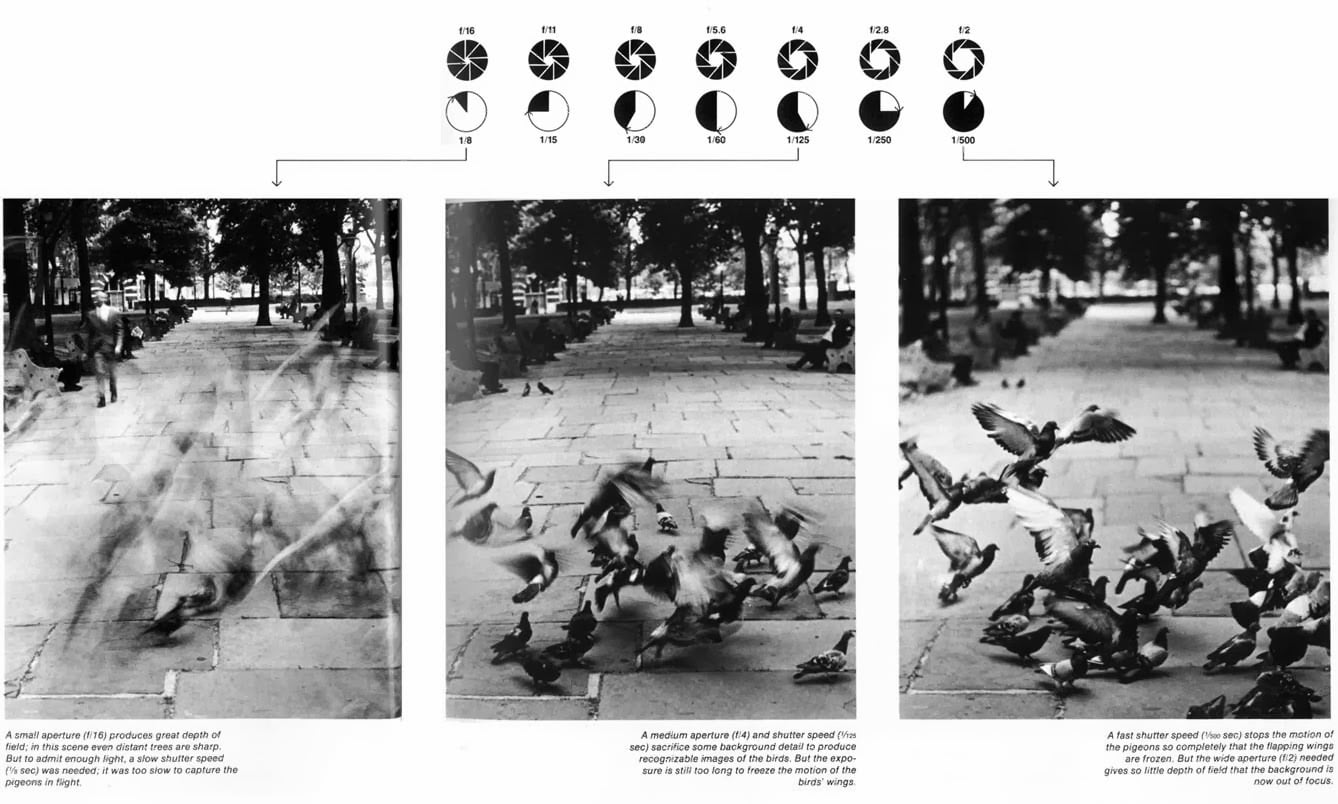
Shutter Speed:

In front of the sensor (the chip that records light in a digital camera, the equivalent to the strip of film in a film camera), is a shutter that opens and closes to expose the sensor to light entering the camera focused through the lens. In an SLR (single lens reflex) camera, this is proceeded by the mirror (which reflects light from the lens to the view finder) rapidly flipping out of the way. The shutter speed, measured in fractions of a second (like 1/60 or 1/120) or whole seconds in long exposure photography (1", 5", 25") determines how long the shutter will exposure the sensor to light after you activate the shutter release.
The faster the shutter speed is, the shorter the amount of time, the more it will freeze still the movement of subjects and reduce blurring of shake or hand movement of the camera body. Faster shutter speeds reduce light entering the camera, which requires brighter available light, or using other settings like aperture and ISO boost light entering the camera to compensate. Longer shutter speeds, which extend the time the sensor is exposed to light, brightens the exposure while blurring the motion of moving subjects, or the entire scene if the camera is hand held and not stablized on a tripod or unmoving object. To prevent overexposure with longer shutter speeds, especially in bright environments, other settings must automatically or manually be adjusted to reduce light, or a darkening filter like an ND filter (neutral density, think sunglasses for a camera lens) must be placed in front of the lens.
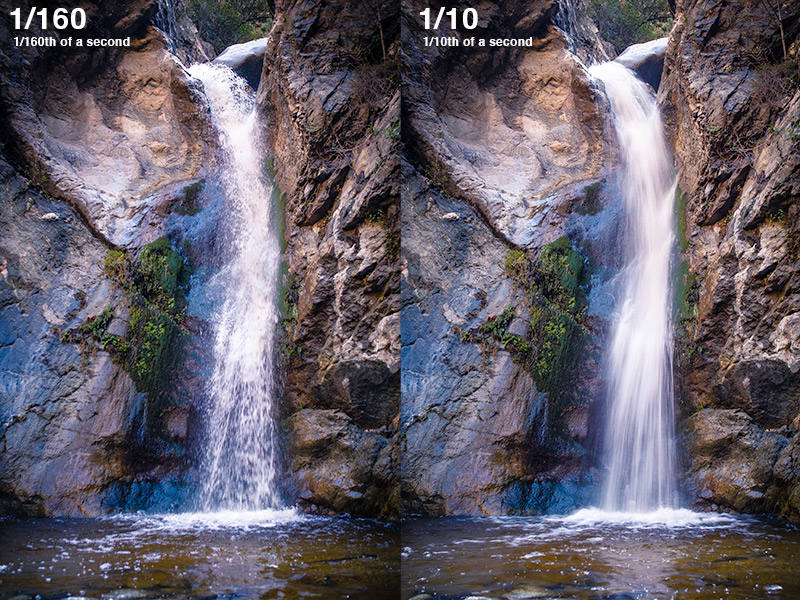
Two images I captured at Eaton Canyon Falls in the San Gabriel Mountains, one at 1/160 and the other at 1/10 of a second shutter speeds.
At slower shutter speeds, especially getting into full seconds, a tripod, or other means of stabilizing the camera, can open up a range of unique shooting subjects, like ultra low light scenes at night, revealing details not seen by the eye, or blurring moving lights into trails and streaks across the image.

I captured this image of a mountain road with my camera on a tripod set to a long 30 second exposure (the maximum setting on many cameras without a remote shutter release) as a vehicle approached.
Aperture:

Aperture, measured in f-stop increments (a ratio system of measuring light in lenses), controls the spiral disc of blades inside the lens that allows light to pass through the lens to camera, functioning roughly like the constriction and dilation of the iris in our eyes, revealing more less of the pupil to light. The more open or wider the aperture (represented by lowering the aperture f-stop values), the more light enters that the camera. Wider, or lower, f-stop settings also shorten the depth of field of the image, meaning the distance or range within a scene that will be in sharp focus or blurred soft focus. This means that only a narrow area of the scene around your lens in-focus point, or focus distance, will be in sharp focus. A smaller, more constricted aperture, (represented by higher f-stop values) reduces the amount of light entering the camera, but broadens the depth of field, allowing objects further from the focus point to be sharper, and reduce background blurring.

F-stops values for a camera lens, the ratio of lens focal length size to the diameter of the aperture pupil, are traditionally roughly a doubling system of increments in regards to amount of light entering. Meaning each f-stop increment higher or lower on the f-stop scale represents roughly a doubling or halving of the amount of light entering the camera.
This can seem counterintuitive at first, but it means the difference between f/8 and going up to f/11 actually represents roughly a doubling of the exposure value or light entering the camera. At the very small end of the f-stop scale (which is also counter intuitively where the aperture is open at it's widest and largest amounts) a very small value change in the f-stop number can be a dramatic difference in light. The difference between f/1.4 & f/2 means twice as much light entering the camera. The reason for this is the non-linear relationship between the diameter of a circle and it's surface area. F-stop ratios measure the diameter of the aperture pupil relative to the lens, but the amount of light entering is effected by the full surface area of the opening.
Many lenses today have introduced a wider options range that include in-between stops from the traditional f-stop scale, so a click up or down can be a finer adjustment than a doubling or halving of the light. Understanding every detail of how the f-stop system works can get real technical and is largely unnecessary to taking good photos, but it's good to keep in mind when experimenting with f-stop values that the numbers have a non-linear relationship with the amount of light and the effect on your exposure.
Depth of field is an important concept effected by the aperture, along with the focus distance set by your focus ring or auto-focus. Also like our eyes, if a camera lens is focused on a subject that is very near, the depth of field of what is in focus is shallower and narrower, than if focused on something further away. This is why you'll see the same aperture values produce very different depths of field when shooting a flower right in front of the camera versus shooting a landscape scene focused on distant mountains. There is some technical math behind this effect, but the important thing to understand is aperture and focus distance effect depth of field in tandem. By experimenting with shooting a range of different subjects while manually controlling the aperture settings you can start developing an intuition for creatively controlling the depth of field of a scene. Whether it be to soften a background in a portrait, or make as much of a scene as possible sharply focused.
As f-stop relates to depth of field, the number relationship is a little more intuitive, bigger f-stops extends the depth of field or focal range, and smaller numbers shrink the focal range.

Two images I captured in a community garden, one at f/3.5 and the other at f/11, as I was experimenting with how much depth of field I wanted.
One final note on how aperture effects light entering the camera, and the aesthetic qualities of your images, is the blade count of the iris. The higher the blade count, the closer the pupil opening will be to a true circle. Fewer blades, makes for more polygonal opening. Where this comes into play is the shapes of light in out of focus areas of an image will simplify toward the shape of the pupil opening. A more circular opening makes softer more perfectly circle like shapes, seen most clearly in out of focus or background city lights. A lower blade count with a more polygonal opening, such as lenses with 5 blades, will create harder edges and more pentagonal shapes in out of focus areas of light. This aesthetic quality of blurred light in photography is called bokeh, from the Japanese word boke (暈け or ボケ), meaning blurred or hazed. A high quality lens with a smoother many bladed iris might be described as having a "soft", "buttery", or "smooth" bokeh.

Light sources in dark settings create pronounced bokeh effects in an image when the depth of field is shallow (low f-stop numbers) or the light sources are far from the focal point.
A wider aperture will make more of a scene blur into bokeh effects, but there is no setting to adjust how the blade count will effect this, it's an innate feature of lenses of different qualities, and can only be changed with different lenses. Photographers looking for the ability to create dramatic bokeh effects also seek out lenses with extra low f-stop values, because the wider the aperture is relative to the lens focal length value, the narrower the possible depth of field, maximizing the areas of a scene that become far out of focus and blurred. Controlling the focus point with a lens set to a very low f-stop value, for soft blurred backgrounds, is frequently used for dramatic effect in cinema.
ISO:
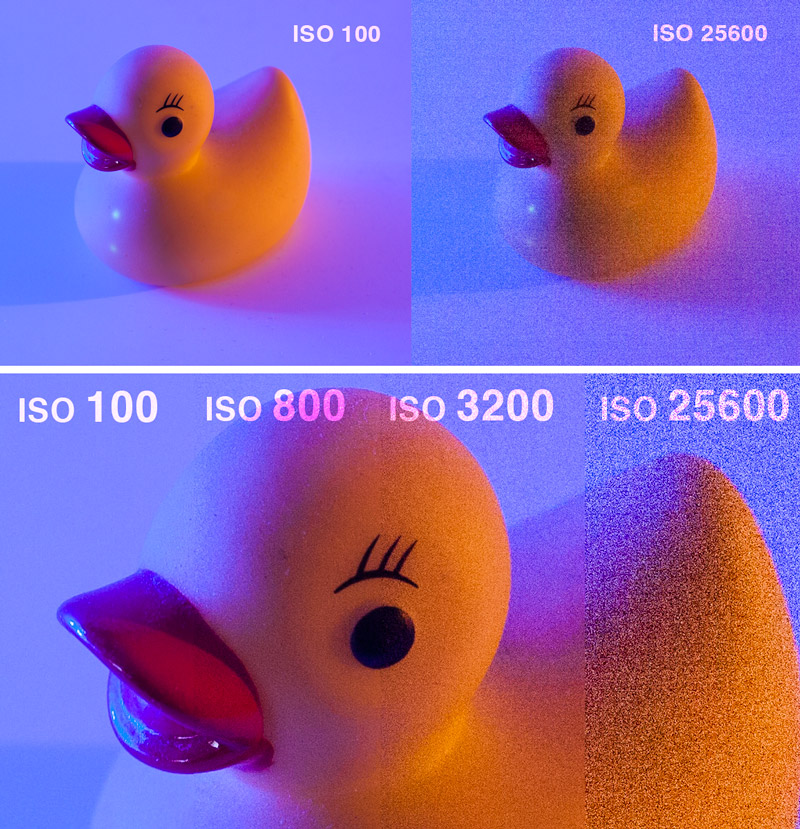
ISO is a standard (created by the International Organization for Standardization) that began in film photography for measuring light sensitivity of film types. In digital photography ISO is used for measuring light sensitivity of the digital sensor, and is manipulated by delivering more or less power to the chip. Higher ISO films produce grainer images, but allow shooting in lower light conditions, and digital ISO settings function similarly. Higher ISO settings boot the light sensitivity of the sensor, but they come at a cost of more image noise and digital artifacting. Digital noise can also produce effects that are often regarded less visually appealing than higher graininess in film, like weird streaks of incorrect coloration or "hot" pixels that blow out to unnaturally bright colors. Some cameras are better than others when it comes to how much noise will be introduced by higher ISO values. Generally speaking you want to shoot with the lowest ISO you can get away with to reduce visual noise in your images, especially when they are going to be viewed or printed out large or seen up close. Some software tools can also try to de-noise images, but they are limits to how much that can be done before you lose too much detail in your image.
Although it comes with potential downsides, boosting ISO values is a powerful tool to capture images in conditions that would otherwise be unworkably dark. It can mean the difference between capturing a moment with more noise and grain, or getting nothing at all. Boosting ISO is great way to get shots in lower light settings without resorting to the artificial lighting quality of an on camera flash, while maintaining shutter speeds fast enough to reduce motion blurring. You can always open the shutter to longer & longer durations to let in more light but if your shutter speed starts dropping to durations much longer than 1/60 of a second, hand shake blurring can start making it impossible to get clear images without a tripod or camera stabilization. Sometimes you might have a situation where you have a fast moving subject, requiring a fast shutter speed, and you want a wide depth of field, requiring a narrow aperture, both of which drop light going to the sensor and might make it hard to avoid under exposing your images.
ISO is your third option that gives you another way to boost the exposure by cranking up the power to the sensor chip, without relying on shutter and aperture changes. Most cameras have both manual and automatic control of ISO, and automatic ISO, at least not when in extreme lighting conditions, can be a way to go full manual for both shutter speed and aperture, while still letting the camera adjust for exposure using ISO. I typically control ISO manually however because I'm often wanting to ensure the least amount of extra grain and noise I can get away with for a given shot.
Once you have a pretty good idea of how shutter speed, aperture, and ISO each function, it becomes clearer how they function together and can be manipulated simultaneously for different visual effects or subject matter. You can have the same subject with consistent exposure but very different combinations of shutter speed, aperture, and ISO to produce very different images.
To take one common example, a high shutter speed image of a person running with a wide aperture can freeze their motion in sharp relief while blurring the background isolating and focusing on the subject. That same scene with a slow shutter speed and narrow aperture (high f-stop value) can make the runner a blurry streak across a sharply focused environment. Both may have the same exposure and amount of light entering the camera, but they differ in style, and they tell different stories by drawing the attention of a viewer to different aspects or details of a scene.
Neither is necessarily good or bad, but they are distinctly different results. Knowing how the core camera settings work, rather than relying on fully automatic modes, lets you make creative choices about how to manipulate shutter speed aperture and ISO, or capture images in scenes that can confuse or frustrate automatic modes. You can start to produce specific desired results for different kinds of subjects, and stumble upon happy accidents that you may want to reproduce later that come out of the process of experimenting with different setting combinations.
The key to getting comfortable with these core camera features is shooting a lot, trying different settings on the same or similar subjects to familiarize yourself with how different settings can produce different images out of the same scene, and shooting a wide variety of types of scenes and subjects. A lot of your images will be throw away, which is fine (and of little consequence in digital). Bring your camera everywhere and practice.